Geissele URG-I Build Overview
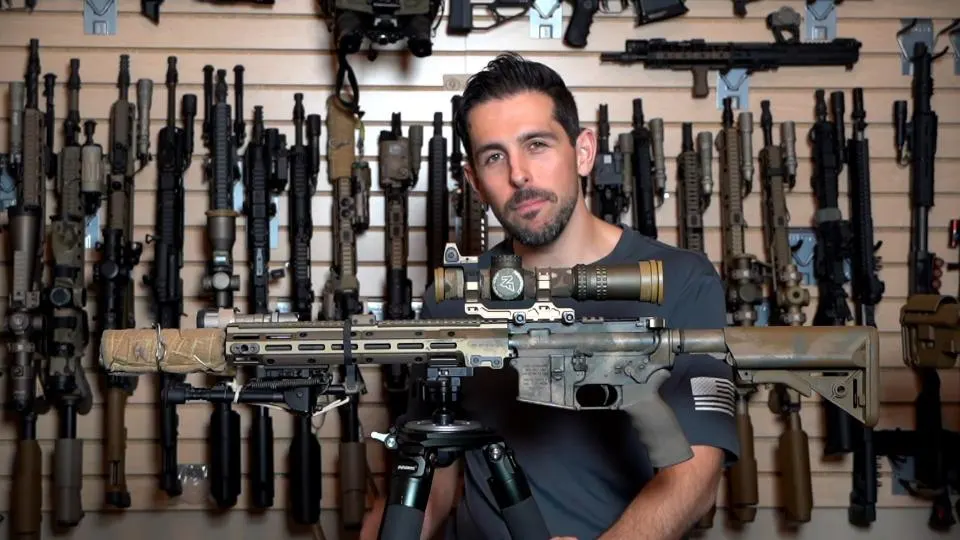
Geissele URG-I Build Overview – The Ultimate Guide to the U.S. Army’s Precision Upper Receiver
Today, we’re taking a look at the part selection, the kitting out process, the build, and the setup of the 9-Hole Reviews Geissele URG-I rifle. For those not familiar with the URG-I, this is a commercially available product from Geissele. It is a complete upper receiver, and it is sort of clone-ish, clone adjacent, or an homage type of product to the actual URG-I, which is used by SOCOM and replaced the Block II. We ran this rifle through the practical accuracy course, and, spoiler alert, this thing is a monster. Henry cleared the 500 yard service rifle course with zero missed and then tagged 650 and 725 with first round hits. That generated a lot of questions and comments asking us to go over the setup, and frankly, it pushed this rifle to very quickly become one of our core reference pieces that we use to measure other rifles against, especially modern rifles like this.

Before we get into the actual build and the kit out of what accessories we have here and why, it’s important to consider the why. Why is this set up in the way it is? Anytime you are building out a rifle, you should ask yourself, “What do I want this rifle to do?” For us, when we first ran this rifle on the practical accuracy course, our configuration was slightly different than this. We had a PEQ that is now gone, and there wasn’t a bipod, which is now here. There are some other small modifications that I’ll talk through. But the removal of the PEQ and the addition of the bipod were very specific choices because originally, we had this configured as a REECE-style GPR build, which you would want to have general purpose capabilities with IR white light and whatnot. We’ve really morphed what we want this rifle to do to be a bit more orientated toward scoped or precision based carbine. And as such, the addition of the bipod and removal of the IR capability makes sense.
So, now let’s talk about the actual configuration with the knowledge in mind that this is sort of pseudo designed as a scoped carbine with AR precision oriented stuff in mind. Still retaining quite a bit of the low end fighting capability, but also being able to push out a bit longer than a more traditional, basic AR. As you might imagine, the focal point of this rifle is the URG-I complete upper. They come in 14.5”, 11.5”, and 10.5”. This one is the 14.5”. It comes with a pin and welded muzzle device, which is a Surefire muzzle device as it ships. That is the one thing about this actual upper that we changed in terms of the actual guts of the upper. The only reason we swapped it is that we had a number of KeyMo suppressors floating around that we were going to be using for this particular build. The one on the rifle currently is a Sandman K with a Liberty Defense suppressor cover. This upper runs a 14.5” barrel with a mid-length gas system. It has a pinned gas block as it ships, and it also comes with the Geissele Airborne Charging Handle and bolt carrier group, as well as the Geissele H1 buffer and their braided spring.

The combination of the buffer configuration, mid-length gas system in a 14.5” barrel, and whatever gas port size they actually have underneath this thing produces an extremely soft shooting rifle. The impulse is very easy to control, and it just feels like butter as it’s running. It does seem like it’s tuned and configured for hotter ammunition, though. Things like the IMI Razor Core 77s that we ran on the practical accuracy course, full power 5.56, the M193 stuff, that’s what we’re feeding this rifle. We have shot it with PMC Bronze, which has historically tended to be known as a lighter loaded round. If you’re shooting with something like that or if you go into the steel cased stuff like Tula, Wolf, etc., where it’s very underpowered or inconsistent, that feels like it’s on the under gassed side with this particular setup. This upper is definitely configured in a way that it wants to shoot performance ammunition and/or generally hotter ammo. Obviously, the addition of a suppressor sort of blows all of that up because of the added back pressure coming into the system.
This particular rifle grouped sort of average without the suppressor. With the suppressor, it was grouping an inch for nine shots which is quite fantastic. Having then had several other URG-I uppers come through our show, this one was the worst grouping without a can. All the others were grouping around an inch to an inch and a half nine shot groups without a suppressor. This one was closer to two inches or two inches with a flyer. But once we added the can, it shrunk things down to an inch or sub an inch in 9 shot groups. Pretty excellent with factory ammunition.
The lower here is just a mil-spec forged lower with the standard trigger guard. We did feel it was fitting to pair this with a Geissele trigger. We went with the SSA-E, which is a two stage trigger. I’ve gravitated toward two stage triggers over the last few years. I feel like I can shoot them just as fast as a single stage trigger, and I like the added take up when I’m doing more precision based stuff. It’s just personal preference, and frankly, there are a bunch of really high quality triggers out there. You don’t necessarily have to spend the money for the Geissele trigger, there are some other ones out there that are really nice and more affordable. The trigger itself isn’t going to make or break the rifle. It can make it nicer to shoot or be a little bit faster or more precise, but for the most part, a lot of that just comes down to marksmanship fundamentals.

The pistol grip is an Ergo Deluxe. I’m a big fan of this one. The palm swell feels really nice, and the angle, while not 100% perfect for me, is the one that I’ve gravitated toward. The safety is a Radian ambidextrous safety, which I have configured to 45 degrees. I like 45 degree safeties. I know some people don’t think that particularly matters. I like having the ambi on here, not so much for functional capability all that much as I rarely use it. Unless I’m shooting in a more precision oriented environment where I like to have my firing thumb on the outboard side of the gun. So having the safety there is nice.

The buffer tube is just a basic, mil-spec tube. For the buttstock, I went with the B5 SOPMOD which is one of my favorite stocks. It’s the perfect balance between being just a regular carbine stock and also giving you just a little bit of extra surface area to rest and make contact with your face. I think one of the most overlooked areas there is on an AR is the stock selection. I don’t think people are paying attention to the right things, in general, when they’re looking at what stock to add to their firearm. Thinks like what the back of the stock looks like and how that mounts into your shoulder as well as what the surface area is for contact on your face and how and where it does contact your face in relation to the height of your optics. For me, I’m loving the B5 SOPMOD with these slightly higher than standard height mounts.

So let’s talk about the optics mount. This is a Badger Ordnance Condition One mount at 1.7”. 1.5” or 1.54” is more of the traditional height mount, and then there is 1.93” on the high end for optics mounts. This 1.7” is perfectly in the middle, and I’m a big fan of it. I don’t know if it’s the end all be all secret sauce. I can shoot 1.93” or 1.54”, but this one to me just feels like a good middle ground for something where I’m going to be spending a good deal of my time in the prone position shooting more precision based, scoped carbine style, but where I still want to be able to be a bit more heads up if I’m doing and 200 yards and in type shooting.

One of the things we swapped from the original build is the top mounted red dot, going from a Holosun 509T to a Trijicon RMR because of some of the height issues we were running into. We also switched from using the actual Badger mount to a Parker Mountain Machine mount because it allowed the optic to come down some. For me, these inline, 12 o’clock red dots are cool, but if you’re actually using them to try to shoot, I find that I’m losing way too much contact on the stock. So, I wanted to get that top mounted red dot as low as possible. I’m not in love with the fact that it’s an open emitter on a rifle. I tend to prefer closed emitters on rifles, so this is sort of a compromise. It’s something that we’re still working out and playing with.

Now to the optic, which is arguably the most expensive thing here, including the actual rifle. This is the Nightforce ATACR 1-8x. It is an exceptionally expensive optic. Do you need this? No, if you were kitting out your own, you definitely don’t. However, these are very nice in terms of being biased toward what we want this rifle to primarily be doing, which is more of the scoped carbine, precision carbine stuff while still retaining an LPVO. If I were to be shooting mostly 200 yards and in, having now shot this a bunch, I would probably not be running this optic. There are some other optics in the premium LPVO arena that my eye just picks up better up close. For example, I seem to see and pick up the Vortex 1-10x and the Primary Arms PLxC better up close. But I like the top end of the ATACR more than those other optics, so that’s why it’s on this rifle where I’m shooting the majority top end. Again, back to that why.
Moving up to the rail, we have the Ergo rail covers and Slate Black Industries Slate Grips. The configuration of these allows the rail to not only have better traction but also insulate you from heat. Also, you’re not beating up your rail as much when you’re slamming the forend into barricades and braces.

Up front, you’ll see we have a scout light. This is one of the mini ones from Modlite which has their PLHv2 head. We made a makeshift light cover using a Holosun bikini cap and some 100 MPH tape. The light is mounted with an Arisaka mount, and we have a Modlite Modbutton tape switch.

Then we have the bipod. This is a 6-9” Harris with a pod lock, and we’ve replaced the linkage with an American Defense mount that has QD capability. This is nice because it allows us to run the gun more as a GPR if we want to. Not only that, but it also shrinks the space between the actual bipod itself and the connection point into the rifle, controlling the apex and how the rifle sits on top of the bipod. Additionally, on the bipod, we have a little field mod that is a piece of paracord tied a certain way, following the instructions from the guys at Ridgeline. It hooks nicely into the pod lock to stow away when not in use, and then you can give it a yank to deploy the legs of the bipod in a quick deploy function.

Lastly, the only other major thing to talk about is sling attachment. We have added a basic M-LOK QD cup up at the front of the rail. We also have a Magpul ASAP QD plate at the back. The B5 stock has QD points in it, and the URG-I rail also had QD cups near the receiver end of the rail. Do you need all of these different QD cups? No. But depending upon how and what I’m doing with the rifle, I like the versatility of being able to align the sling in different areas.

So that is the 9-Hole Reviews URG-I configuration as it stands today. We’re always tinkering and tweaking with different parts on the rifle. The most important thing that we’ll leave you with is the initial commentary. When you’re configuring your own setup, what are you trying to get the rifle to be able to do? Are the choices you’re making with gear and the configuration of those pieces of gear conducive to that goal? Those are the key pieces that you should take away from a session like this.
Until next time, we’ll see you on the range.